

How to get root cause analysis right for NATA

We all love that feeling when NATA accepts our first response to an assessment report! But since NATA introduced their new reporting format, we’re seeing NATA reject many responses from labs because they haven’t included an adequate root cause analysis.
If you’re struggling to understand what NATA expects for cause analysis, you are not alone.
The new reporting format, introduced in February this year, requires a detailed root cause analysis for any non-conformity. This is a good thing because without an adequate root cause analysis the same issues crop up again and again. But many labs are stumped as to how to get root-cause analysis right for NATA and the betterment of their quality system.
NATA tells us that some labs are just skipping this section and submitting responses with NO cause analysis at all. These responses are automatically rejected by NATA and will lead to an extra round of correspondence.
Meanwhile, those that do fill it out, even labs accredited for many years, are often failing to identify the root cause of an issue raised by NATA. So what is NATA looking for in this section of the non-conformance report? Here’s some root cause analysis tools and tips that will help you please NATA, while also improving your quality system.
1. Tell the truth
You don’t have to have some amazing technological problem that caused the issue they found. It could be that the person simply did not know they were supposed to do a particular step and the root cause would then be “ lack of training”, “poor work instructions”, or “lack of communications about changes introduced while staff away on holidays”. Or in some cases, it could simply be human error. Whatever the cause, put it plainly. There is no need to window-dress what happened.
Often the issues identified by NATA are potential problems, i.e. someone COULD get in and inadvertently change some test results. So your root cause analysis for this might say that you did not think the risk of that happening was high enough to address the issue previously. Or you might say that you had overlooked this risk when you designed the process.
Another common cause for non-conformity is when new requirements are put out by standards-writing bodies or regulators. Be honest and explicit – write; “had not updated the system to new regulatory requirement” or “was unaware of new regulatory requirement”. These are root causes that you can address effectively and simply, through your internal audit program, for example.
2. Make sure the answer is something that can be addressed
There’s no point telling NATA that the root cause of everything was “human error”, even if human error played a part. To err is human, and we can’t have full control over that. Focus your investigation on the PROCESS and see what could be changed to make it easier to get it right every time. Fixes for human error generally fall into categories such as adding checklists, extra checks, removing the step from the process, incorporating automation, etc.
If you can’t think of a possible fix for the root cause, it’s probably not worth documenting.
3. As many causes as necessary
Most of us know that when something REALLY goes wrong, there are multiple steps that have failed. Even in the most straight-forward laboratory processes, there are always checks in place that will pick up errors. So at least one step, plus the checking step must have failed for an error to occur.
4. Use these tools to help you
If you’re really stuck, there are some tools that provide a structure for doing a root cause analysis. Here’s our top 3:
1. The 5 Whys
Simply asking why until you get to a cause that can be fixed is often all that’s needed. Five Whys is a questioning technique used to highlight the cause-and-effect relationships leading to a particular problem. The goal of the technique is to determine the root cause of a defect or problem by progressively repeating the question “Why?”. Each answer provides the basis for the next question. Here’s a simple example:
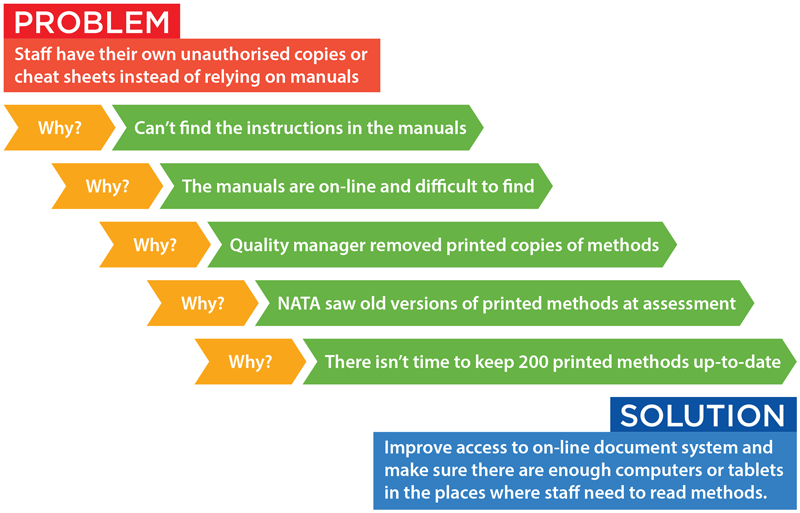
Often you will identify several possible causes and perform Five Whys on each of those causes. And of course you may end up asking fewer or more than five questions!
2. Fishbone analysis
A cause-and-effect diagram that resembles a fish’s skeleton. This visual tool helps managers pinpoint the reasons for imperfections, variations, defects, or failures. The problem is at the head and the causes for the problem feed into the spine leading to the head. This illustrates point 3 above about multiple causes leading to an error.
3. Flowcharting
When you can’t identify a particular cause, flowcharting the process can be a good place to start. By flowcharting the complete process involved in the non-conformance, you can pinpoint where the weak points in the process could be (this can be at more than one point). You then identify who has involvement at each step and all the inputs. Often, just creating this flowchart will be enough to inform management of the problems with the process and clarify what needs to be tightened up.
With all of the approaches and tools outlined above, keep in mind that the purpose of a root cause analysis is to minimise the probability of an issue occurring again. It is an important process aimed at getting to the bottom of problems, safeguarding quality and creating a more reliable and efficient laboratory.